Rare Earth Magnet Conversions
"Rare Earth" Magnets are great for units that can have multiple weapon configurations, like Tau Battlesuits, Space Marine Dreadnoughts, and Tyranid Hive Tyrants.
I ordered my magnets from AmazingMagnets.com, however there are many different vendors with similar products.
I ordered the smallest disk magnets that they had:
D040A 0.125" Diameter x 0.040" Thickness
NdFeB Disc Magnet, Grade N40, Ni Plated with Matte finish
Axially Magnetized
A pack of 85 + Shipping cost me $12 (USD). I ordered them on a Friday and they arrived the following Monday! Excellent turn around time! They also included a free sample pack of various sized and shaped magnets that I have yet to do anything with.
CAUTION: The magnets are very small and very strong, so patience is required when working with them. (If you line up the polarity incorrectly, they WILL shoot across the room and poke someone's eye out!)
So far, I have used them in the arm sockets of a Dreadnought, for the standard weapons and chin mounted Assault Cannon on a Land Speeder, for interchangeable Sidecars for my Attack Bikes, and the most difficult of all, for all of the weapons on a 3rd Ed. metal Carnifex.
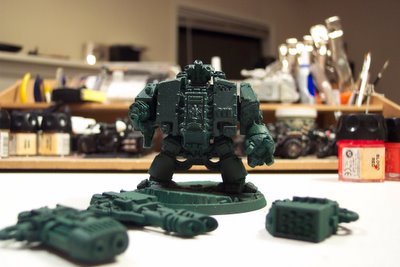
Now onto the project. I'll use my Dark Angels Dreadnought as the basic example, as it is the most straight forward conversion.
The supplies that you will need for this conversion are:
* Space Marine Dreadnought
* 0.125" x 0.04" Disk Magnets - See above
* Metal Hobby Knife
* Glue - I prefer QuickTite Super Glue Gel.
* Metal File/ Sanding Stick - You never know when you might need one.
* Dremmel Rotary Tool - An excellent drill for this type of hobby.
* 0.125" Drill Bit
* 0.125" Cutting/Grinding Bit - This tool comes standard with many Dremmel kits and can also be purchased seperately at most hardware stores.
To install a pair of magnets to create a removable joint or weapon mount:
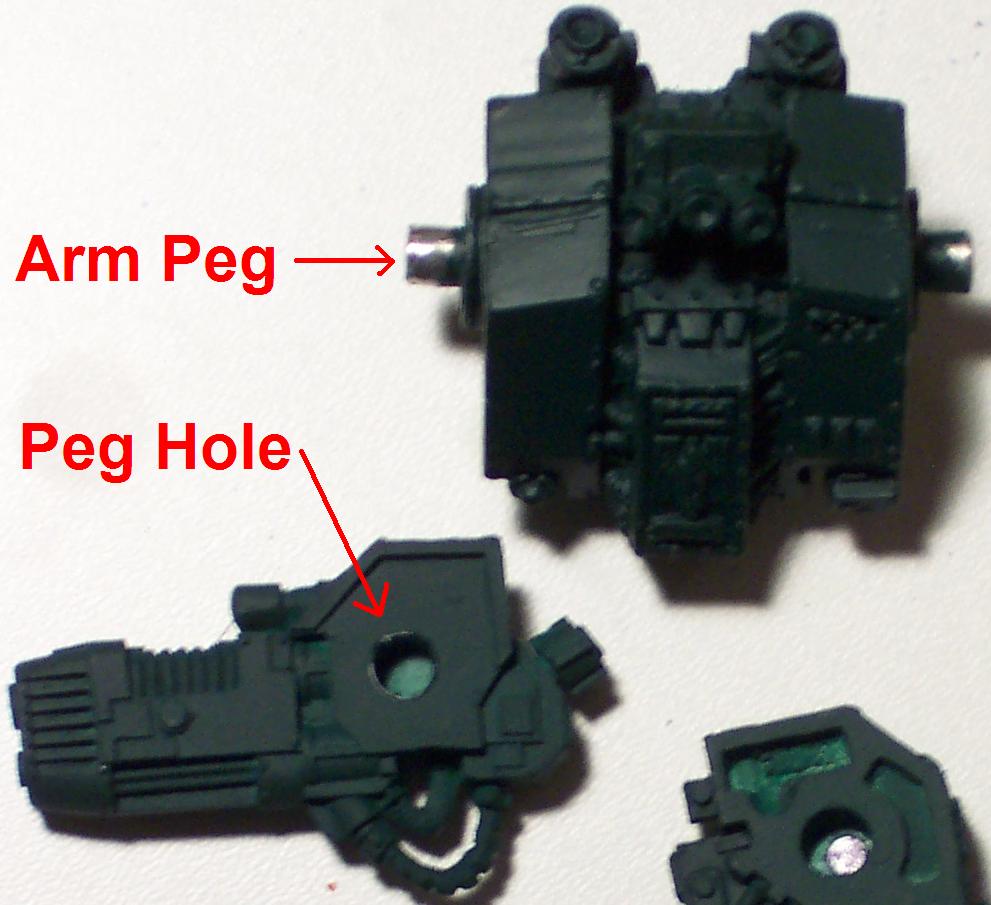
1. Begin with the larger of the two connecting components, in this case, the body of the Dreadnought. Drill out a shallow hole the same width and depth as the magnet, 0.125" diameter x 0.040" depth, into the most secure and central point at which the second component will contact. In this case, the hole will be drilled directly into the end of the "arm peg".
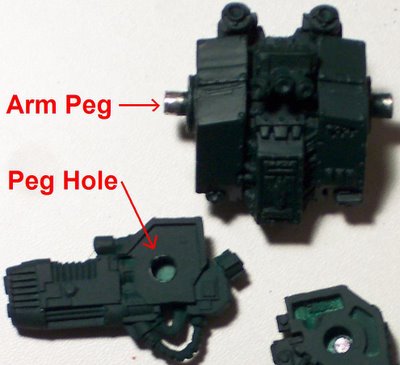
2. Use the 0.125" grinding tool to flatten the bottom of the hole. Now you should have a hole with the exact dimensions of the magnet.
3. Use a sharpie, or other marker, to note the polarity of the magnet before you move on to the next step. I simply choose one side to be the marked side and mark all of the magnets accordingly. Mismatched magnets are not good!
4. Attaching the magnet. To manouver the magnet, pick it up with the back (unsharpened) side of the blade of your hobby knife near the point. The magnet will easily stick to this flat surface and you can use the knife to hold the magnet in place while the glue dries.
4a. For holes in plastic, you may simply need to press the magnet into place. In my experience, the friction of the plastic against the sides of the magnet can be enough to securely hold it in place. You might want to glue it anyway, I did for the extra security.
4b. For holes in metal and those holes which do not offer a tight grip, use a spot of super glue to hold the magnet in place. LET THE GLUE DRY BEFORE ALLOWING ANY OTHER MAGNETS INTO ITS VICINITY!!! These magnets are so strong, that if the glue bond is not properly set, the magnet will flip over in its hole and fly across the table toward your other magnets/hobby knife.
CAUTION: Another important point is that if you are gluing one magnet in close proximity to another, you MUST hold the magnet in place until the glue has formed a strong bond. Otherwise, the magnet may fly over to the other one and end up glued to it, or flip over in its own hole in an attempt to line up its polarity with the other one!
5. You are half done. Now repeat these steps with the other components (the weapons) that you want to affix to the first component (the body). For the Dreadnaught, you can simply drill a hole in the exact center of the "peg hole" or, if you don't mind the extra separation it will create, you can glue the second magnet directly inside of the "peg hole" itself.
A single pair of these magnets are the perfect strength for holding the plastic/resin arms to my Dreadnought, however they are a little weak when it comes to the heavy metal arms. The heavier arms don't fall off, but they do droop a little when agitated.
Additional Projects:
LANDSPEEDER:
For the Landspeeder's metal assault cannon, I used two sets of magnets (to support the hanging weight) , spaced about 0.25" apart (right where the pegs on the cannon are).
1. I drilled 2 magnet holes into the chin of the speeder spaced 0.25" apart. The walls of the speeder are thinner than the magnets, so I had to use a thin film of super glue around the inner edge of the hole to fasten the magnets in place. Friction may have worked here as well, but the piece was going to be hanging and I did not want to take the chance, not to mention the fact that the magnets could have been pushed through and lost in the interior of the speeder (expensive rattle).
2. Since the cannon itself is small, I did not drill holes into it. Instead, I simply cut off and filed down the mounting pegs and glued two magnets in their place. Remember my warning about gluing magnets in close proximity!

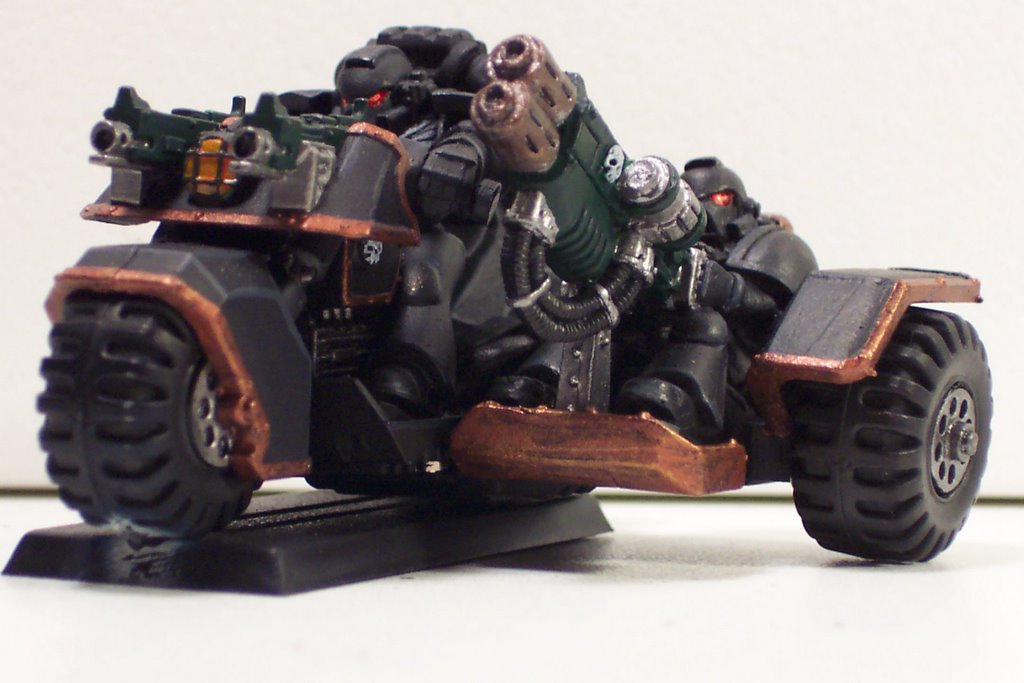
ATTACK BIKE:
To create interchangeable Attack Bike Sidecars, I had to use three pairs of magnets due to the weight.
1. Similar to the Assault Cannon in the previous example, the Sidecar mounting flange is thin and I did not want to drill holes in it. Instead I simply glued three magnets to its surface.
2. Take care when drilling holes in the underside of the Bike itself, the Bike is hollow and many of its components are thin. See: LANDSPEEDER step one.
3. After attaching all of the magnets, you can then attach a standard bike base to the bike if you want, just make sure you leave enough clearance to switch out the sidecars (0.04" for the exposed magnet in addition to the thickness of the sidecar mounting flange)!


I'll post instructions for the more difficult Carnifex conversion as soon as I get a chance to photo it.
Oh, and when you're all done, don't forget the most important step:

Enjoy!
I ordered my magnets from AmazingMagnets.com, however there are many different vendors with similar products.
I ordered the smallest disk magnets that they had:
D040A 0.125" Diameter x 0.040" Thickness
NdFeB Disc Magnet, Grade N40, Ni Plated with Matte finish
Axially Magnetized
A pack of 85 + Shipping cost me $12 (USD). I ordered them on a Friday and they arrived the following Monday! Excellent turn around time! They also included a free sample pack of various sized and shaped magnets that I have yet to do anything with.
CAUTION: The magnets are very small and very strong, so patience is required when working with them. (If you line up the polarity incorrectly, they WILL shoot across the room and poke someone's eye out!)
So far, I have used them in the arm sockets of a Dreadnought, for the standard weapons and chin mounted Assault Cannon on a Land Speeder, for interchangeable Sidecars for my Attack Bikes, and the most difficult of all, for all of the weapons on a 3rd Ed. metal Carnifex.
Now onto the project. I'll use my Dark Angels Dreadnought as the basic example, as it is the most straight forward conversion.
The supplies that you will need for this conversion are:
* Space Marine Dreadnought
* 0.125" x 0.04" Disk Magnets - See above
* Metal Hobby Knife
* Glue - I prefer QuickTite Super Glue Gel.
* Metal File/ Sanding Stick - You never know when you might need one.
* Dremmel Rotary Tool - An excellent drill for this type of hobby.
* 0.125" Drill Bit
* 0.125" Cutting/Grinding Bit - This tool comes standard with many Dremmel kits and can also be purchased seperately at most hardware stores.

To install a pair of magnets to create a removable joint or weapon mount:
1. Begin with the larger of the two connecting components, in this case, the body of the Dreadnought. Drill out a shallow hole the same width and depth as the magnet, 0.125" diameter x 0.040" depth, into the most secure and central point at which the second component will contact. In this case, the hole will be drilled directly into the end of the "arm peg".
2. Use the 0.125" grinding tool to flatten the bottom of the hole. Now you should have a hole with the exact dimensions of the magnet.
3. Use a sharpie, or other marker, to note the polarity of the magnet before you move on to the next step. I simply choose one side to be the marked side and mark all of the magnets accordingly. Mismatched magnets are not good!
4. Attaching the magnet. To manouver the magnet, pick it up with the back (unsharpened) side of the blade of your hobby knife near the point. The magnet will easily stick to this flat surface and you can use the knife to hold the magnet in place while the glue dries.
4a. For holes in plastic, you may simply need to press the magnet into place. In my experience, the friction of the plastic against the sides of the magnet can be enough to securely hold it in place. You might want to glue it anyway, I did for the extra security.
4b. For holes in metal and those holes which do not offer a tight grip, use a spot of super glue to hold the magnet in place. LET THE GLUE DRY BEFORE ALLOWING ANY OTHER MAGNETS INTO ITS VICINITY!!! These magnets are so strong, that if the glue bond is not properly set, the magnet will flip over in its hole and fly across the table toward your other magnets/hobby knife.
CAUTION: Another important point is that if you are gluing one magnet in close proximity to another, you MUST hold the magnet in place until the glue has formed a strong bond. Otherwise, the magnet may fly over to the other one and end up glued to it, or flip over in its own hole in an attempt to line up its polarity with the other one!
5. You are half done. Now repeat these steps with the other components (the weapons) that you want to affix to the first component (the body). For the Dreadnaught, you can simply drill a hole in the exact center of the "peg hole" or, if you don't mind the extra separation it will create, you can glue the second magnet directly inside of the "peg hole" itself.
A single pair of these magnets are the perfect strength for holding the plastic/resin arms to my Dreadnought, however they are a little weak when it comes to the heavy metal arms. The heavier arms don't fall off, but they do droop a little when agitated.
Additional Projects:
LANDSPEEDER:
For the Landspeeder's metal assault cannon, I used two sets of magnets (to support the hanging weight) , spaced about 0.25" apart (right where the pegs on the cannon are).
1. I drilled 2 magnet holes into the chin of the speeder spaced 0.25" apart. The walls of the speeder are thinner than the magnets, so I had to use a thin film of super glue around the inner edge of the hole to fasten the magnets in place. Friction may have worked here as well, but the piece was going to be hanging and I did not want to take the chance, not to mention the fact that the magnets could have been pushed through and lost in the interior of the speeder (expensive rattle).
2. Since the cannon itself is small, I did not drill holes into it. Instead, I simply cut off and filed down the mounting pegs and glued two magnets in their place. Remember my warning about gluing magnets in close proximity!

ATTACK BIKE:
To create interchangeable Attack Bike Sidecars, I had to use three pairs of magnets due to the weight.
1. Similar to the Assault Cannon in the previous example, the Sidecar mounting flange is thin and I did not want to drill holes in it. Instead I simply glued three magnets to its surface.
2. Take care when drilling holes in the underside of the Bike itself, the Bike is hollow and many of its components are thin. See: LANDSPEEDER step one.
3. After attaching all of the magnets, you can then attach a standard bike base to the bike if you want, just make sure you leave enough clearance to switch out the sidecars (0.04" for the exposed magnet in addition to the thickness of the sidecar mounting flange)!

I'll post instructions for the more difficult Carnifex conversion as soon as I get a chance to photo it.
Oh, and when you're all done, don't forget the most important step:

Enjoy!
posted by blue loki at
12/22/2005 02:15:00 PM
![]()
![]()


0 Comments:
Post a Comment
<< Home